
The Sneaky Sabotage was the first Break Narmer Mission available during Veilbreaker which involves Kahl’s sneaking into a Narmer Veil Factory.
During this mission, you will need to sabotage the production of Veils which will later cause them to overload and short out other Veils in the future.
This mission will require you to be a bit stealthier when it comes to your approach as you will need to evade Narmer Deacons.
How To Get Sneaky Sabotage Mission?
The Sneaky Sabotage Break Narmer Mission is a weekly rotation mission that is available among three Break Narmer Missions.
There will be certain weeks where this Break Narmer Mission will be available, and it can be started by interacting with Kahl-175 at the Garrison.
Sneaky Sabotage Mission Objectives

1) Sneak Into Warehouse
As you begin this mission, Kahl will be starting in a small room, and you will need to make your way toward a waypoint where a doorway is blocked by a barrier.
During this part of the mission, Daughter will be speaking to Kahl about what they should do to stir up trouble with newly produced Veils.
2) Disable Energy Barriers
There will be a nearby Narmer Console which will allow you to control a Narmer Camera that you will need to use to locate the power source of the barrier.
The power source will be highlighted, and you can aim at it with the camera and press your fire button to disable it.
At other times, the power source can be found by tracing the wires back to their sources, which will help you find them faster.

3) Use Security Thing
Another Narmer Console will be in the next room and this time, there will be three power sources that need to be destroyed.
Two will be visible from the camera but this time, to get the third power source you will need to switch to another camera.
This can be seen as a floating machine with a large orange glyph above it and you can point to it and press the fire button to switch to it.
Once you have switched views to the other camera, you will be able to see the other power source and take it out.
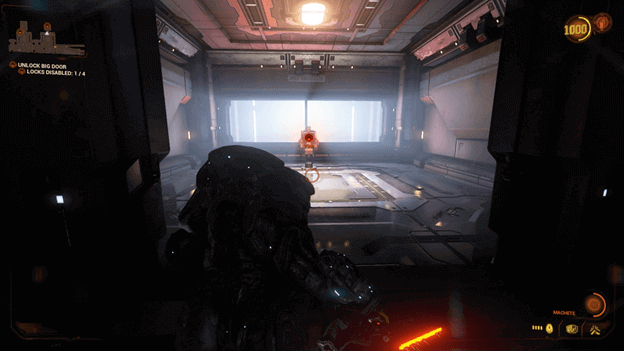
4) Unlock Big Door
This is where things can be a bit tricky, and you will need to trace four power source lines to the sources of their power.
Be sure to watch out for Narmer Deacons since you will not be able to kill them at this point and will need to avoid their line of sight.
One lock will already be disabled but there are three more that you need to find to disable them, starting with making them visible.
There will be two consoles that allow you to access cameras and you should enter the room to your left after going down a flight of stairs.
Before going to the room where the Camera Console will be (marked with orange) you should interact with the nearby Cargo Console. (Marked with yellow)
Once you raise the Cargo Platform, one of the locks will be visible on them and you can now disable them using the camera which you can access in the nearby room.
After disabling the lock, the console will no longer be marked and there will be another one marked with an orange waypoint.
Head to the other console but be sure to first interact with the two consoles which will allow you to make the other locks visible.
One console will be to raise a cargo platform while the other one will be down an elevator to raise a nearby lift.
After you have interacted with both consoles marked with a yellow marker, head to the orange-marked console and disable the locks.
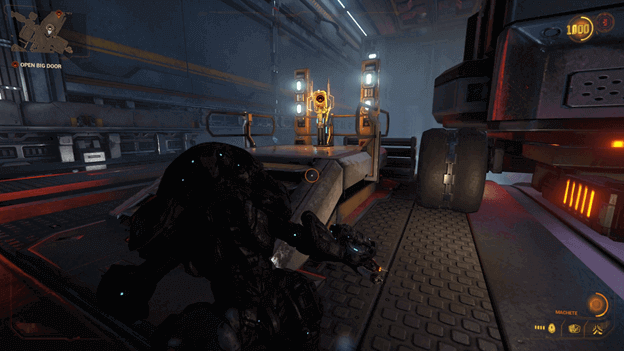
5) Open Big Door
When the locks have been disabled, you will be able to head to another console which is marked by a waypoint that you will need to hack.
This will open the large doors ahead and allow you to pass through to the next area where you need to sneak past more Narmer Deacons.
6) Sneak Into Factory
Continue making your way toward the next waypoint and fight off any robots that get in your way but be sure to avoid the Narmer Deacons.
Sneak past the Narmer Deacons and you will be instructed by Daughter to find the Production Controls, which can be reached after heading up a flight of stairs.
7) Find Production Controls
As you sneak past the Narmer Deacons, make your way to the waypoint that marks the location of the Production Controls.
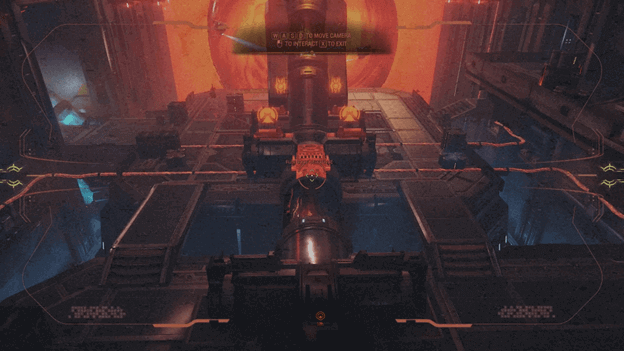
Once you reach the Production Controls, interact with them and you will need to figure out how to give Daughter a way to inject her sabotage instructions into the system.
When interacting with the console, you will enter the camera view again and this time there will be a system with four glyphs above them.
You will need to trace back each glyph by following their power line to find out which glyph they should be changed to.
Some of the glyphs may be revealed by moving objects out of the way or by switching camera views to other ones in the area.
Once all the glyphs have been matched, you can aim at the front of the glyphs to run the boot sequence, allowing Daughter to insert her sabotage instructions.
8) Grab Target Marker
Daughter will instruct you to make things look like a raid so no one will expect there was any tinkering with the system.
A weapon storage behind you will open and you will need to grab the Exergis before proceeding to grab a Target Marker for a Plasma Torch.
9) Use Plasma Torch
Once you have picked up the marker, use the Plasma Torch (a marked area will be suggested but you can fire it anywhere) to kill some enemies.
You can use this Plasma Torch now to kill enemies, which includes Narmer Deacons who were previously unkillable.
10) Escape
After testing out the Plasma Torch, make your way toward the exit which will be marked by an extraction waypoint.
Be sure to use your Plasma Torch to take out any Narmer Deacons before they catch up to you or they will put a Veil on you. (Will count as a death)
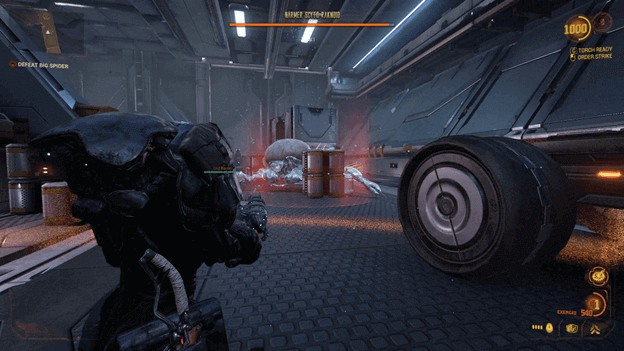
11) Defeat Big Spider
As you make your way toward the exit, you will encounter a Narmer Scyto Raknoid, which you will need to defeat before you can escape.
You can make use of the Plasma Torch to deal a heavy amount of damage to it and shoot the Ln2 Barrels nearby to freeze it for a moment.
12) Get To Extraction
After defeating the Narmer Scyto Raknoid, continue making your way toward the extraction waypoint and the mission will come to an end.
Sneaky Sabotage Mission Rewards
Depending on how many objectives you have completed as you have done the mission, you will be rewarded with the following amount of Stock:
- Deathless – Complete the mission without dying and without being veiled (30 Stock)
- Find K-Drive Things – Find the 4 confiscated K-Drive parts (15 Stock)
- Get Chipper’s Tools – Find and collect Chipper’s Tools (15 Stock)
- Break Narmer Veils – Remove 5 Veils using Veil Breaker (15 Stock)
- Genestamp Collection – Collect 5 Genestamps (15 Stock)
- Kahl Go Fast – Complete the mission in under 15 minutes (15 Stock)
If you do not complete some objectives, you can redo the mission to complete the ones you have missed or those you failed to do.
Tips
- During your first time doing this mission, you will encounter Chipper in one of the console rooms who you will be able to free using the Veilbreaker.
- It is best to analyze the travel patterns of the Narmer Deacons so you can sneak by them safely to avoid sight.
- The Narmer Scyto Raknoid can be lured to the Ln2 Barrels to easily be frozen, allowing you to hit them with the Plasma Torch.
Summary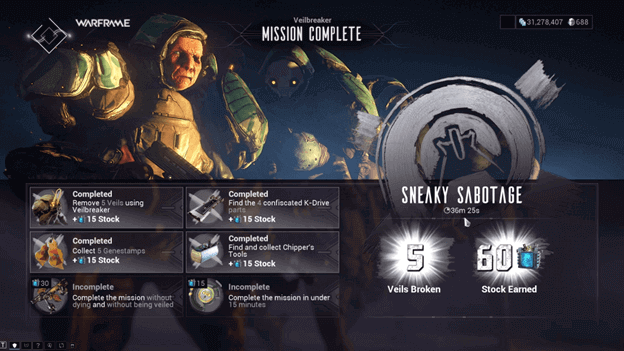
You have successfully snuck into the Narmer Facility and inserted Daughter’s Sabotage Plans into their system to rig the Veils.
It is only a matter of time before the Veils that have been rigged will trigger and disable other Veils near them, freeing captives in the future.
It is during this mission that you will have been able to free Chipper who will, later on, sell items for Stock at Kahl’s Garrison.
Contents