A simple guide how to create mods for Urtuk.
Some coding experience is required.
To know proof of concept click here
Introduction
so there is nothing to see or edit at the first glance.
People with some coding experience might know, that .jar’s are simply containers for build Java programs (artifacts) and can consist of the compiled code (.class), external libraries (.dll/.so) as well as resources (images, text files, …).
The .jar format itself is actually the same as .zip, so if you want to check these resources, simply open the .jar as zip (Open with 7Zip, WinRar, …) or rename it to .zip.
The resources of Urtuk only consist of images, atlas files (descriptors for how to parse specific images), sound files, and localization files. The for modders important databases and configurations are missing, so, where are they?
The answer is, hardcoded.
Accessing the Game Code
To do so, we have to look a bit through it first. This can be done via java decompilers like ,uhm, Java Decompiler[java-decompiler.github.io]. Simply download the decompiler and open the jar of the game with it. The result will look quite similar to how it looks when you opened the jar as zip, but this time the compiled Java classes (.class) will be decompiled and their more or less original Java code can be seen. Please be aware, that decompilers can make mistakes.
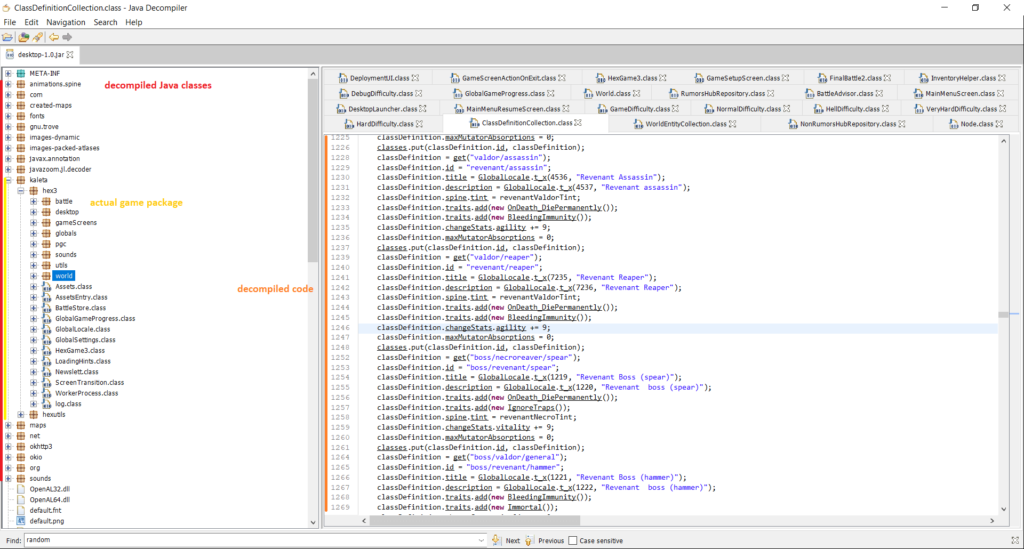
As a general hint on how to find specific stuff if you can’t find it,
look for stuff that might use what you’re looking for.
In the following example, we’re looking for the unit data by looking for the champion Amos.
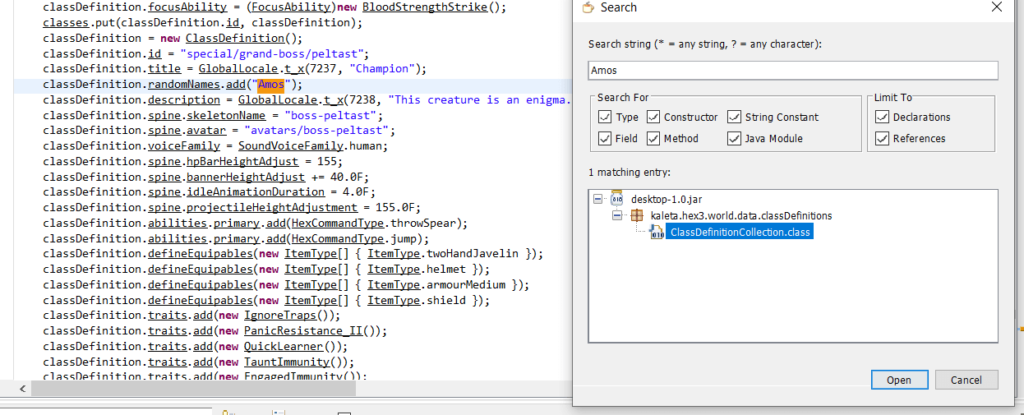
Similar queries can be used to find mutators and other stuff.
Creating Mods
One option would be trying to recompile the whole game based on the decompiled classed, but trust me, that won’t work without a lot of trouble and the mod would have the same size as the game – to not mention the violation of the copyright.
Another one would be hooking into the running game via tools like Frida, but that’s also quite bothersome and not something normal people can do.
So, what other option is there?
Well, there is a really simple one, and that is using the game as an external library.
Anyway,
After this is done, we can start working on our actual modifications.
e.g. editing the HexConstants[github.com]
If what you want to change is something else, it will be a bit trickier to apply your modifications.
Here is how it has to be done.
1. create a new java class as an extension of the original class[github.com]
2. copy the functions of relevance (call other classes you have to edit, contain what you want to edit)[github.com]
3. replace all usages of the original classes with your own (simple name change) and remove all:
- {original class name}.this
- {original class name}.thisx
4. apply your modifications
That’s it, nothing more, nothing less.
After this is done, simply build your project as an artifact and you’re finally free to run your own mod and give it to others as well.
Afterword
Some simple measures they could take to do so would be:
- moving files outside of the jar into a separate zips or folder for easier access
- initializing the databases via json files instead of hard-coding all entries
- above could also be used to load extra files created by mods, which would overwrite and add entries to said databases
These changes would also make updates faster for the users,
because only the changed files and not the whole game would have to be downloaded after every update.
Contents