This guide is meant to help players understand the combat in CK3 from the basics to the semi-advanced. It breaks down each category of combat and attempts to explain how they function.
Soldier Stats
- Damage: The basic attack stat, attack modified by various factors such as terrain and commander ability then the damage is dealt against the enemies toughness.
- Toughness: The basic defence stat, when toughness reaches 0 for a unit they are dead.
- Pursuit: This is damage but for the retreating phase, when the battle is over the pursuit stat is added on top of the damage to deal more damage to retreating enemies.
- Screen: Simply put, it decreases the amount of damage a soldier can take when they are retreating. Think of it as a separate toughness modifier only used when retreating.
Conclusion: Simply put, you these stats are added together for each individual soldier to create the battle. If you have 1000 levies vs 1000 levies that will be 10k damage and toughness vs 10k damage and toughness. Thus, the modifiers of the commander + terrain + random dice rolls + etc… will determine the outcome of the battle.
Little Tidbit
Troop fighting is up to 50% of your warscore so do not neglect it to only siege, it should actually be your first priority to fight in a decisive battle as you can really snowball a conflict by 1-2 decisive victories early in the war.
Troop types
- Soldiers: 1 soldier is the smallest count of unit, 1 soldier can be 1 levy or 1 man at arms.
- Regiments: Usually a regiment is 100 of the same type of soldier. 100 levies is 1 regiment while 100 pikemen is 1 regiment of pikemen. However, the number can be different depending on special men at arms such as Mangonels or Heavy Cav. The way the level up system for men at arms works based on regiments.
- Levies: The simplest form of troop that give 10 Damage and 10 Toughness per unit.
- Men At Arms: The bread and butter of combat. Works in a rock, paper, scissors system called counters.
10% of your men at arms are regained per month so make sure you are ready for war at least 10 months in advance per regiment you need. - Knights: For each point of Prowess a Knight receives 100 Damage and 10 Toughness that is added into the battle. Knights are one of the best ways of increasing the quality of your army as they add a lot of power to the fight for very little expense. If an army loses a Battle, each Knight has a 10% chance to be captured and imprisoned and 5% chance to be killed. The chances are increased to 55.3% and 27.6% respectively if the army is defeated in the Early Battle Phase.
Mercenaries: They cost a good chunk of money. However, they have 0 maintenance cost and will be available for three years. Mercenaries are a critical factor in winning wars as they enable your domain to support much more troops than it could ever muster.
Countering
How Counters Work
HF = Heavy Footmen
LF = Light Footmen
A counter essentially reduces the damage of the opposing regiment type. So in the example of 100 HF vs 100 LF, HF would have a damage penalty in combat.
The penalty depends on the amount of troops of both the countering, and the countered units, up to a 90% penalty.
You need 2:1 to get 90% penalty. So 1:1 is half that; 45% penalty.
So 100 vs 100, the HF will be doing 45% less damage than normal.
So effectively, the LF will be 10 damage, 16 toughness.
The HF 17.6 damage, 22 toughness
→ So the HF win.
At 200 vs. 100 though, the LF will be 10 damage, 16 toughness (and there’s also twice as many of them) The HF will be 3.2 damage, 22 toughness.
So the HF get destroyed.
Break-even point is probably somewhere around 3:2.
Phases of Battle
Modifiers before battle
- +30 if army is defending across a strait
- +20 if army is defending across a large river
- +10 if army is defending across a river
- +5 if liege is leading the army
- -10 if realm is in debt
- -10 if army is gathering
- -10 if army is low on supplies
- -25 if army is out of supplies
- -30 if army is attacking across sea
Some definitions before we get into it
- Routed Casualties: Casualties out of battle but not dead.
- Fatal Casualties: Casualties that are now dead and need to be replenished.
- Maneuver Phase: Not much to be said, this is where the commanders pit their skill against each other and initial advantage rolls are made. The better the commander, the better off you will be in this stage.
- Early Battle Phase: The armies fight and inflict damage upon each other daily and cannot retreat. If an army is defeated in this phase, all Routed Casualties become Fatal Casualties.
- Late Battle Phase: The armies keep fighting and keep inflicting damage upon each other each day until either all soldiers on one side run out of Toughness or one side decides to retreat. If an army retreats all remaining soldiers become Routed Casualties.
- Aftermath Phase: The winning army attempts to turn Routed Casualties into Fatal Casualties. When the phase ends the defeated army moves into an adjacent Barony with all Routed Casualties and cannot be given orders until if finished travelling a couple of Baronies away, but will travel slightly faster than controlled armies.
This is where most casualties are inflicted and the math comes into play so here is a simplified version of what happens.
The base retreat cost is -250, and the more positive the number fewer casualties you take.
Cost Lowered by:
- If you own the realm +340
- If you retreat with war friend +200
- If in own territory +60
- Against own culture or religion +10 and +30
- Retreating from own capital is by far the best +100
- In a coastal tile +10
- +0.05 per alive soldier in retreat
Cost Increased by:
- -0.01 per tile away from capital
- -0.2 per enemy soldier in the battle
- -60 if retreating into occupied territory
- -50 per tile you will retreat *IMPORTANT* REMEMBER NOT TO CLICK TOO FAR AWAY IF MANUAL RETREATING *IMPORTANT*
Important note when retreating, the default amount the game will auto retreat you is 7 tiles. Still, you can retreat up to 15 tiles so manually retreating between 4-6 provinces is preferred as your retreating troops are faster than the enemy.
However, you do not want to engage them immediately after getting out of battle as this will result in a lot of casualties since your army has not yet recovered.
I would like to note the Aftermath phase was the part I personally understood the least and I am not 100% sure about all the numbers in the defines so if anyone can explain it better than me please PM me and I will edit the guide accordingly.
Troop Costs
Many of you might have seen that when you raise your levies, your income goes into negative and you might go into debt if the war goes on for too long.
Here is some quick math on how to make sure you never go into debt.
For levies, the cost is 0.0033 ducats per troop. So just multiply that by your levies, and your men at arms costs then you can see how long you will be able to sustain a war.
Formula: ( # of levies * 0.0033 ) + raised men at arms costs = monthly expenses.
Special Circumstances
Raiding
Your army maintenance decreases by 50% so raiding is a very profitable avenue to explore if it is an option for you.
Supply
Losing Supply
Defined by the number of troops you have in an individual tile.
You will at a maximum lose -10 supply a month after your commander effects so no matter what malus you have you won’t snowball into a supply death.
You will at minimum lose -5 supply a month before your commander effects. Therefore, you can really reduce your supply malus with some stat bonus’. This is very useful when fighting in distant lands.
By default you will have 100 supply per army before any commander traits apply, this means you can last at minimum 10 months before your troops just start to die.
However; be warned if you drop below 50 supply, you will start taking combat malus’.
Regaining Supply
The best way to gain supplies is by going into friendly territory and making sure the supply limit of the tile can take your army. Once you find a suitable tile, sit there for a few months and regain the lost supplies.
In your own realms you can 30% more supply, and in sub-realms (vassals and the such) you regain 15% more supply per month.
Attrition
Attrition is a loss of Levies and Men-at-Arms that is caused when an army is out of Supply, is besieging a Fortified Holding or is located in a hostile County that is only bordering other hostile Counties and is not coastal.
Sieges
How difficult it is to besiege a Fortified Holding is determined by its Fort Level, which can be increased by certain buildings and modifiers.
The base amount of Siege Progress needed to occupy the Holding is 100, and each Fort Level increases it by 50.
Being attacked while besieging a Fortified Holding will make the besieger the attacker of the battle, making them lose any terrain defensive bonus.
The difficulty of a siege increases with the fort level, meaning the siege progress you need to reach is higher with higher fort levels.
Special Unit Note
There are special siege units that effect siege modifiers.

Garrison Events
Sieges have events every 20 days base, resulting in breach, lowering supplies or disease in city, increasing siege speed.

Fort Levels
Difficulty is increased by 350 per fort level
Each level increases defender morale by 50
Warscore
Warscore is a measure of which side is winning a war. It ranges from -100 to +100, each point added to one side being subtracted at the same time from the other side.
Warscore is gained by winning Battles, occupying Holdings, taking prisoners and especially having control of the Casus Belli’s Objective. Capturing the enemy ruler grants +100 Warscore, capturing the enemy heir grants +50 Warscore and occupying the enemy capital grants +10 Warscore.
At +30 Warscore the winning side can call for White Peace, and at +100 War score the winning side can force the losing side to accept defeat.
Combat Width
Combat width is defined by the defenders size If defender has 1000 soldiers then the combat width is 1000.
Do note combat width will be a minimum of 100, this shouldn’t really be relevant for anything but tiny early game battles.
Terrain
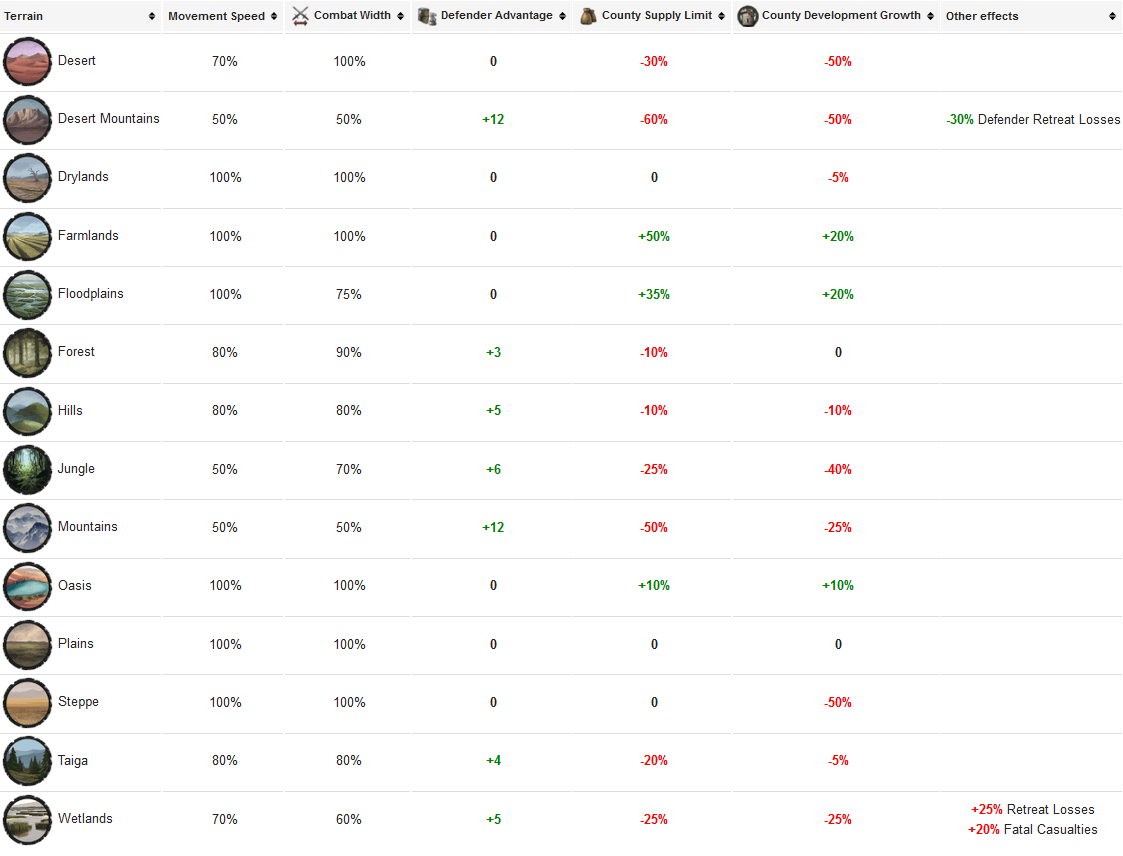
Each Barony has a dominant terrain. The terrain determines the movement speed and combat width in the Barony and can affect the supply limit and development growth in its County.
Consult this chart if you are unsure what modifiers are given by which terrain (credit to CK3 wiki)

- Cost: It costs 1 ducat per 100 troops you embark. Maintenance increases by 25% for all troops when they are embarked.
- Attrition at sea: You do not take any attrition for the first 30 days of being at sea, so try and limit how long you are out there.
- Disembark penalty: For the first 30 days, you get penalty of -30 for combat.
Written by: My cousin is playing today
Contents
