
This guide will go over the basics of farming, and will be more in depth than the game’s tutorial.
Overview and Disclaimers
Farming is obviously a major part of this game. In this guide we will cover several different aspects of farming, and will be more involved than the tutorial.
This guide is primarily for people who found that the tutorial didn’t shed enough light on the game’s mechanics, and as such may seem a bit redundant to more experienced players.
We will not be going over any of the game’s guns, enemies, bosses, most upgrades, farm animals, or any other material not mentioned directly.
Keep in mind this guide will only cover the basics and will not go into later game material, especially things found after year one.
Soil and Pickaxes
Before we get to sowing any seeds, we must first discuss how the soil works. There are three different “phases” of soil, the default state, the broken up state, and the tilled state.
The default state is what the majority of the ground is at the start of the game. In order to utilize this space, the ground has to be broken up with a pickaxe. Pickaxes are found through various means, such as:
- Crates found in areas outside the farm
- Occasionally sold from the flower guy in town for 100 Cashews
- Rare drops from enemies
- Rare drops from weeds
Due to how rare pickaxe drops are, it is important to conserve them. As such, never let any broken up land return to the default state. Even if that tile was broken up before it will have to use another pickaxe to break it up again.
The player’s pickaxe amount is shown in the bottom left corner of the screen.
 Zero pickaxes
The rate of which the ground is broken up or tilled depends on the level of farming skill. The higher it is, the faster it will go.
Once the ground has been broken up, it can be tilled and then sown with seeds. Obviously, tilled land is the only phase that can support plants.
In addition to all these phases, there are weeds that can cover tiles during any phase. Weeds start out small, and can be quickly be cleared with a single click or just squishing them. However, if left unchecked, they will grow larger and more rampant. Similar to the ground, weeds get cleared at a rate proportional to the level of farming skill. No weeds will ever grow in top of existing crops, so there is no need to worry about that.
Fertilizer
As the name implies, fertilizer is used to fertilize crops. Fertilizing crops makes them more valuable overall, and is a key component on merging crops (more on that later). Fertilizer will despawn when left on the ground for too long.
Fertilizer is displayed in the bottom left corner of the screen.
 Zero Fertilizer
Fertilizer can be obtained in many different ways. These include:
- Killing enemies
- Killing bosses
- Cutting up farm debris
- Rarely cutting up weeds
- Rarely given by farm animals
- Rarely given by some spouses on the farm
The way fertilizer appears to work is that the more is given to a crop the more likely it will be a “good” crop. Note that this does not mean that each fertilizer will increase the value of a crop by a set amount, but rather increase the chance of it being worth more. If enough is given, the chance is guaranteed.
Crops and Seeds
Sowing seeds is just as simple as it sounds. Just plant them. There are several different kinds of crops found throughout the game, but what is more important is to know the different varieties of crops and where to acquire them.
The player will start out with no seeds in their inventory, but there will be a basket next to them containing four potato seeds. This is the start if your crop empire.
There are many different ways to obtain more seeds. These include:
- Freeing small critters outside the farm
- Opening giant flowers found outside the farm
- Sometimes cutting up weeds
- Rarely from harvesting crops
- Buying them from the flower guy in town
Saving small critters refers to the squirrel-like creatures that are guarded by enemies at small outposts. Upon killing all the enemies, they will drop a few seeds when approached.
 A small critter
Seeds come in different varieties, qualities, and profits. While I could go into a lot more detail with that, I don’t want to spoil too much of it. Just remember this for the most part: the harder the seeds are to get, and the better they look upon harvest, the more valuable they are. The last part of that refers to whether or not a crop was a “good” crop upon harvest instead of a “bad” crop. Here’s an example of that:
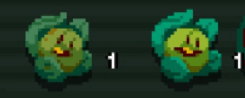
A “bad” and “good” cabbage.
The one on the left was picked without any fertilizer, giving a good chance that it would be “bad.” The one on the right is the complete opposite, having had fertilizer applied to it and increasing the chance for it to be a “good” crop. “Bad” crops won’t ever sell as well as “good” crops, so it’s important to keep that in mind before harvesting. Now, that doesn’t mean throw fertilizer on every crop. Since some crops are by default more valuable than others they should take priority when being fertilized. These are generally the same crops that are harder to obtain.
Mega Crops
Let’s talk mega crops. You’ve likely seen them in the game’s trailers, so here’s how to do it. Mega crops can be grown by planting four identical crops in a 2×2 square and fertilizing all of them. This will cause all those crops to merge into one, large crop. Mega crops are significantly more valuable than their smaller counterparts.
A mega cabbage and a regular cabbage side by side.
The “good” and “bad” crop idea still applies with mega crops; “good” mega crops will be worth significantly more than their “bad” counterparts.
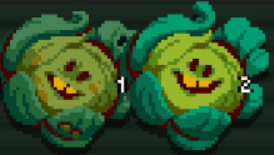
“Bad” and “good” mega cabbages.
Even though all crops are more valuable in their mega form, certain mega crops will still be more valuable than other mega crops. These are the same normal crops that are more valuable than other normal crops. So those crops in their mega form should take priority during fertilization.
Mega crops cannot merge with each other, so don’t bother trying.
Fruit Trees
In addition to all the other crops, here are four different fruit trees that can be planted. These include apple, banana, date, and peach trees. Each ones of these trees occupy a 2×2 space on their own, meaning that they up the same amount of space as a mega crop. What makes them different from all other crops is that, as long as they are not eaten, will continue to provide harvests for the rest of the game. This means that these trees will provide a nice sum of Cashews all on their own.
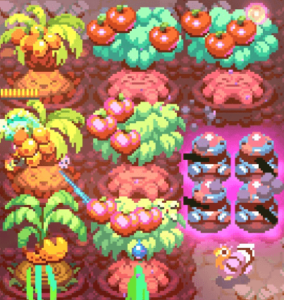
A whole orchard of fruit trees.
These trees are also capable of merging as well, potentially making a large sum of Cashews in doing so.
Watering
Watering has a simple purpose: to water crops. The player can only hold a limited amount of water at a time, displayed in the bottom left corner.
 4/4 units of water
The player is only able to water one crop at a time, unless they have the Doubled Headed Water Can upgrade. Each watered crop will deplete the stored about of water by one. Fortunately, the size does increase with farming stats, allowing the player to store more water. The watering can is able to be refilled at any time at the well. It is recommended to keep farming operations near the well because of this.
Watering crops is also required to put them out if they are burning. Unfortunately, it’s difficult to water fast enough to put out several flames at a time. As such, if multiple crops are engulfed, it’s likely that several of them will be lost.
However, there are other units that can assist the player in watering. The most common of these is the cow. Upon being rescued, cows will wander around the crops and water them one at a time. In addition, there is an item called the Sprinkler Head that allows for turrets to water crops. Getting a decent amount of both cows and turrets with the upgrade will greatly speed up the watering task, and may save all crops from a dreadful fire. But perhaps the most efficient item at watering is the rain cloud scroll, which you’ll find out the world.
Cashews
Cashews are the game’s currency. They are acquired through farming and selling crops, eggs, or wild produce. Each crop varies in value.
The player’s current Cashew count is displayed at the top left corner of the screen.
 Zero Cashews
A few achievements are associated with Cashews. Each of them involve having a certain amount at any given moment; one achievement is given at 5,000, another at 15,000, and the last one at 30,000 Cashews.
Roses
Roses are special crops that are not sold for Cashews but used primarily for romance. The player can give a certain amount of roses to bachelors/bachelorettes in town to increase their relationship with them. The cost starts at three roses, and increases by one for each subsequent increase. So for the first exchange it will be three roses, the second four, etc.
Roses are also used to buy upgrades from the exclusive shop during the town fair at the end of each season. These are generally two or three roses each.
 A rose
There are some means of obtaining roses, though for the most part they are hard to come by. These methods are:
- Freeing flamingos drops two rose seeds
- Killing bosses drops one rose seed
- If the player reaches a certain milestone during judgement they will get one rose seed
 Three rose seed packets
If four roses are planted in a 2×2 square they will automatically merge, requiring no fertilizer to do so. Doing so will net the player one extra rose upon harvest.
Health System
This game features an interesting health system that can be difficult to maintain. The player’s current health can be found at the top left corner of the screen.
 The Heart Beet health bar
The amount of “Heart Beets” depends on several factors, such as which character and the current year. Generally though, as the years increase, the amount of Heart Beets decrease. Obviously, if the player takes damage they will lose one Heart Beet, and if they take too much damage they die. The only way to regain Heart Beets is to grow them from Heart Beet seeds.
![]()
![]() A Heart Beet seed packet
A Heart Beet seed packet
Heart Beet seeds can be acquired in numerous ways. These include:
- Killing bosses
- Rare enemy drops
- Rare weed drops
- Rare seed drops from Flamingos and other trapped critters
- Buying them from the flower guy in town for a large sum of Cashews
- Buy them from the grass scientist in town for Roses. Price starts at one rose, and increases with each seed bought. So the first seed cost one Rose, the second will cost two, etc.
- Occasionally offered by bachelors/bachelorettes in town for Roses. The cost depends on what level of relationship the player is currently on.
- One seed is given by the mayor if the player reaches a certain milestone during judgement
Once a Heart Beet seed has been acquired the player will have to grow them, just like any other crop. Instead of growing them when they are immediately needed, one strategy is to save them and grow them in a 2×2 square and fertilize them. Similar to roses, Heart Beets will benefit from this buy giving one extra crop. So instead of only receiving only four Heart Beets if they were planted otherwise, the player will get five. This does require a significant amount of fertilizer to produce however, perhaps making it less worthwhile.
Because of how Heart Beets are used exclusively for health, they cannot be sold for Cashews.
There is a way for the player to sometimes increase the total amount of Heart Beets. This can only be done when the icon of a Heart Beet in the ground appears next to the health bar. Grow and harvest enough, and that will increase the maximum HP by one. It cannot be increased further.
End Notes
Contents